
QIDI Q2
4.3Editor score
Nozzle-based first-layer sensing
65°C heated chamber
Up to 600 mm/s speed
Explore the 10 best auto bed leveling 3D printers for beginners, comparing setup ease, first-layer reliability, speed, build volume, and essential features.
Automatic bed leveling removes one of the most intimidating parts of starting an FDM 3D printing journey. Instead of manually adjusting the bed beneath the nozzle, a beginner can select an automatic calibration routine, let the machine measure key points, and begin with a more dependable foundation for the first layer.
This guide compares ten printers and leveling products according to setup complexity, calibration methods, motion stability, build volume, speed, extrusion control, material support, and features that reduce common beginner errors. It includes complete automatic printers, an upgrade kit for compatible Creality machines, and a manual electronic leveling aid for printers without built-in automation.
Each selection reveals which beginners it best suits, along with its most useful advantages and practical limitations. The E-Leveler 2 offers a low-cost way to improve a manually adjusted bed, while the remaining picks provide native or upgrade-based automation. Product availability and selling prices can change, so readers should verify current specifications and offers before buying.
4.3Editor score

4.3Editor score

4.3Editor score
The comparison below covers the key differences among all ten selections, including the leveling approach, first-layer system, maximum speed, and build volume or compatibility. It helps distinguish complete beginner printers from manual leveling aids and add-on sensor kits.


The FLASHFORGE Adventurer 5M combines one-click fully automatic bed leveling with a fast CoreXY motion system, making it a well-rounded option for a first serious FDM printer. Its 4.3 rating reflects a strong balance of setup convenience, speed, and useful reliability features. The key advantage for a newcomer is that the leveling routine automatically calibrates and levels the bed rather than requiring repeated manual wheel adjustments.
We may earn a commission when you buy through this link, at no additional cost to you.
Its CoreXY system reaches a maximum speed of 600 mm/s and acceleration of 20,000 mm/s², while vibration compensation is intended to reduce ringing and ghosting at higher speeds. The removable dual-sided PEI plate is valuable because one side supports common PLA and PETG work, while the reverse side is intended for PETG-CF. A quick-detachable 280°C nozzle and a 32 mm³/s flow rate also make the machine more versatile than a simple starter printer.
Several automated systems reduce common interruptions. A filament run-out sensor allows filament to be changed when the spool empties, and power-loss recovery can resume a print from the point where it stopped. The heated nozzle reaches 200°C in 35 seconds, according to the supplied product information, which can help reduce waiting during a changing workflow. These are worthwhile features for beginners, although the open design means temperature-sensitive advanced materials are not its primary strength.
This is the strongest general recommendation for someone who values simple setup, rapid operation, and a removable build surface. It is less compelling for users whose main goal is printing engineering thermoplastics in a fully enclosed heated chamber. For most beginners working on models, prototypes, organizers, and functional parts, however, the Adventurer 5M provides a convincing combination of accessibility and capability without requiring manual leveling.
The one-click leveling workflow is the central beginner benefit. It reduces the number of variables a novice must manage before the first print, allowing the machine to establish the nozzle-to-bed relationship and simplify first-layer setup.
CoreXY motion, 600 mm/s maximum speed, acceleration controls, and vibration compensation give the printer considerable performance potential. These features are most useful when the chosen profile and material are matched to the machine rather than forcing maximum speed on every project.
The removable PEI steel plate makes surface changes straightforward, while the detachable nozzle supports different nozzle diameters. Together, they help one machine cover detailed models, quicker prints, and tougher filament jobs.
We may earn a commission when you buy through this link, at no additional cost to you.
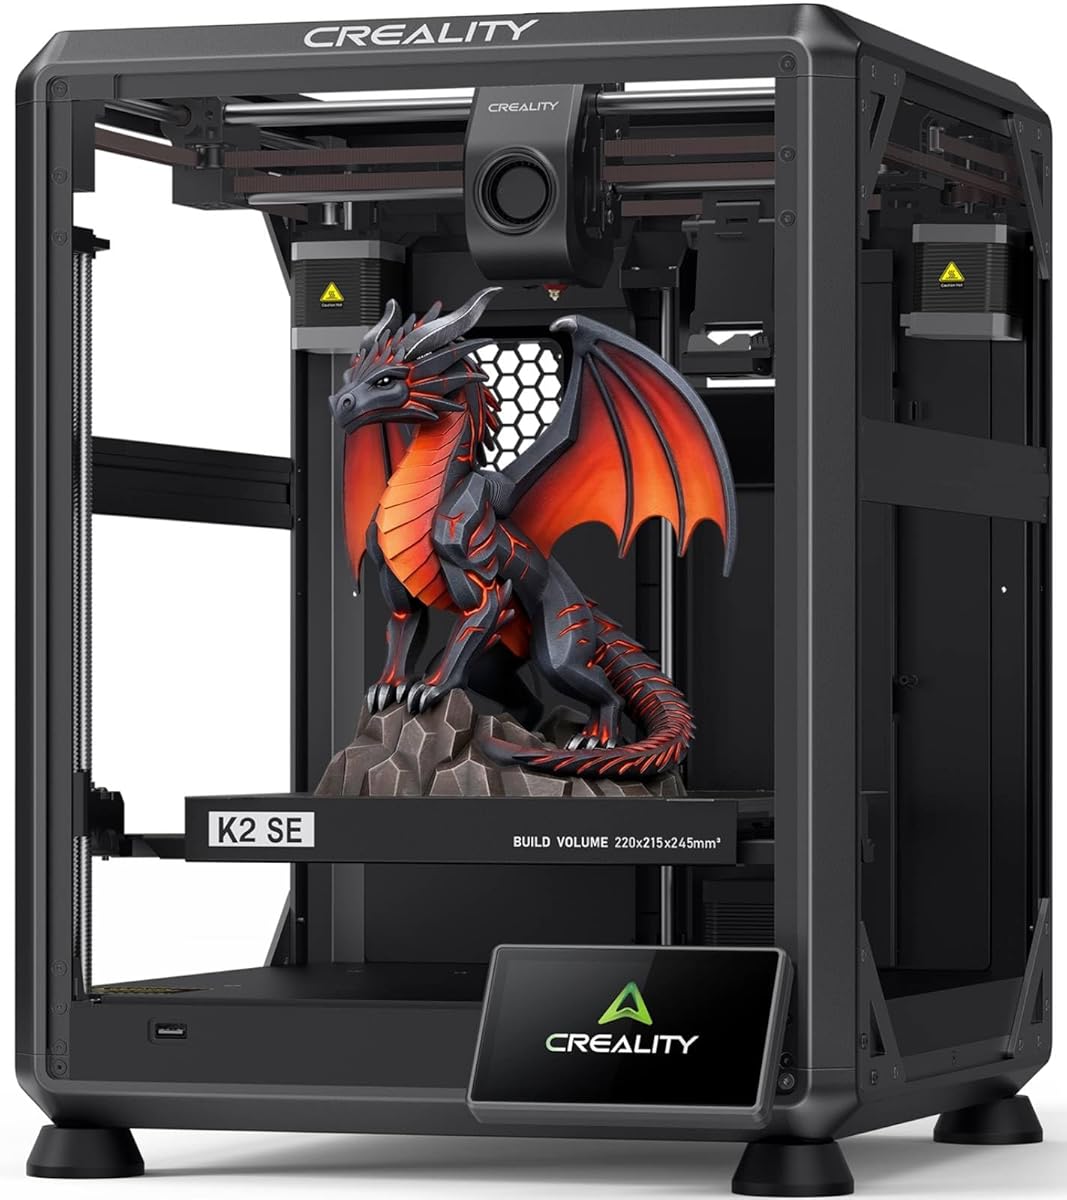
The Creality K2 SE is designed as an approachable but expandable printer, with one-tap bed leveling, touchscreen guidance, and a stated five-minute assembly process. Its 3.8 rating makes it less uniformly favored than the higher-rated models, yet the supplied specifications show a strong feature set for buyers who may later want multicolor printing. The automatic setup includes bed leveling, fan calibration, and first-time tuning.
We may earn a commission when you buy through this link, at no additional cost to you.
Its lightweight CoreXY arrangement supports printing up to 500 mm/s with acceleration of 20,000 mm/s². A built-in vibration sensor and input-shaping algorithm help control ringing at faster speeds. Mechanical rigidity comes from a die-cast aluminum alloy frame, corner gussets, and dual-sided crossbeams, all intended to reduce frame flex and support more consistent dimensions during rapid movement.
The most distinctive benefit is compatibility with the Creality CFS multicolor system, which is sold separately. When paired with CFS, the printer can support automatic filament identification, relay switching, tangle and run-out detection, and multicolor slicing through Creality Print. The modular direct drive extruder also adds a quick-swap nozzle, hardened steel dual-drive gears, and a built-in run-out sensor.
The K2 SE suits beginners who want an easy first print but also value future expansion. It is less ideal for someone seeking the simplest possible purchase or the highest rated option in this list, particularly because the advanced multicolor hardware requires an additional purchase. For users who plan to expand, the combination of automation, rigidity, direct drive, and CFS support is unusually versatile.
The touchscreen Quick Guide walks users through assembly and calibration, including bed leveling and fan setup. This reduces the need to learn several separate procedures before making the first print.
The modular direct drive system provides controlled feeding and a quick-swap nozzle for reducing maintenance time. Its gear design is also presented as suitable for detailed work and dependable filament handling.
CFS compatibility gives the K2 SE a clear upgrade path without changing the core printer. It is an attractive choice for hobbyists and model makers who want a single machine to progress from monochrome projects to multicolor designs.
We may earn a commission when you buy through this link, at no additional cost to you.
The E-Leveler 2 is not a complete printer, but it is a focused answer for beginners who own a 3D printer with a manually adjustable bed. It uses an electronic LED level to provide visual feedback while the bed is adjusted, reducing reliance on guesswork. Its 4.3 rating is especially notable because it addresses a specific and common setup problem without requiring a major printer upgrade.
We may earn a commission when you buy through this link, at no additional cost to you.
The improved design includes a stronger battery holder, a clearer LED indicator, bed-adjustment reminder arrows, and a simplified nozzle target. A plastic end cap serves as stabilizing legs, helping the leveling aid balance itself during use. This approach is less automated than a sensor-equipped printer, yet it can make the familiar process of adjusting four bed corners considerably easier for a first-time owner.
Compatibility is broad but not universal. The E-Leveler 2 is designed for 3D printers with a manually adjustable print bed. It does not work with resin printers or Delta printers, so buyers should confirm the machine type before considering it. Unlike the CR Touch kit, it does not require installation, motherboard changes, or firmware flashing.
This is the best budget pick for a user who wants to improve first-layer consistency without replacing the printer. It is less appropriate for someone specifically seeking one-click automatic leveling or a complete machine. For a compatible entry-level printer, however, the E-Leveler 2 offers a focused, understandable, and comparatively inexpensive way to make bed adjustment more visual and repeatable.
The LED gives immediate feedback about whether the nozzle and bed are correctly spaced. Instead of repeatedly checking an uncertain gap, the user can adjust the bed while watching a clear indication.
Because it works with most printers that have a manually adjustable bed, the tool can improve an existing machine without an electrical modification. It is most relevant to owners who do not want to replace a functional printer.
The leveling aid is not compatible with resin or Delta printers, and it does not create a fully automatic calibration system. Checking the bed type before ordering avoids disappointment.
We may earn a commission when you buy through this link, at no additional cost to you.
The FLASHFORGE AD5M is explicitly positioned for beginners and experienced users alike, with one-click automatic calibration at the center of the experience. Its 4.3 rating reflects a well-liked machine that combines a 600 mm/s maximum speed with an all-metal CoreXY structure. The bed system measures the nozzle-to-build-plate distance and calculates offsets automatically, reducing the need for manual leveling tools.
We may earn a commission when you buy through this link, at no additional cost to you.
The all-metal CoreXY design supports stable, low-noise high-speed motion, while the quick-release nozzle can be changed in as little as three seconds. Nozzle options of 0.25, 0.4, 0.6, and 0.8 mm allow the same printer to serve fine-detail jobs and faster material output. The removable, double-sided PEI steel plate also supports easier model removal and has a PETG-oriented reverse side.
Workflow automation extends beyond the initial calibration. Orca-flashforge supports one-click batch file transmission and multi-printer network monitoring, while the Flash Maker APP provides remote status checks, print monitoring, and parameter adjustment. If electricity is interrupted, the printer saves the ongoing layer and resumes when power returns, adding useful protection for longer jobs.
The AD5M is a strong recommendation for a beginner who wants an automatic workflow and room to expand into more demanding printing. Its capabilities may be more than required for very simple projects, but the quick-swap nozzle, recovery function, and stable motion system reduce friction across many types of work. It is particularly attractive when consistent first layers matter more than owning the smallest possible machine.
Automatic distance measurement establishes the correct nozzle-to-plate offset and compensates for bed variation. This is a meaningful convenience for users who are still learning how bed squaring, Z-offset, and first-layer adhesion interact.
Four available nozzle diameters cover a broad range of resolution and throughput needs. Rapid tool-free changes make moving between a detailed model and a functional part more convenient.
Power-outage recovery can return the machine to the current layer after electricity returns. That reduces the disruption caused by an interruption, although regular filament and bed checks remain important.
We may earn a commission when you buy through this link, at no additional cost to you.
The QIDI Q2 takes first-layer control seriously by using the nozzle itself as the leveling sensor. Its 4.3 rating reflects a printer built for users who may begin with simple projects but expect to handle advanced thermoplastics later. The nozzle-based sensing approach is intended to remain unaffected by the bed surface, supporting accurate calibration and a plug-and-play setup.
We may earn a commission when you buy through this link, at no additional cost to you.
A second-generation heated chamber reaches 65°C to reduce warping and improve layer adhesion, while a 370°C nozzle opens the door to demanding materials. The full-metal CoreXY frame and precision linear rails support stable printing up to 600 mm/s. An upgraded 1.5GT synchronous belt is also intended to reduce vibration artifacts and produce smoother surfaces.
The feature set extends into monitoring, recovery, materials, and air quality. Automatic leveling, filament run-out and tangle detection with QIDI BOX, AI camera monitoring, and power-loss recovery all support unattended workflows. QIDI BOX enables as many as 16 colors and dry-while-print operation for multi-material projects. A three-stage filtration system combines a G3 pre-filter, H12 HEPA filter, and activated carbon.
The Q2 is the premium choice for a beginner who values reliable first layers and may eventually print ABS, PA, PC, PPS-CF, or carbon- and glass-fiber composites. It is not the simplest possible machine conceptually, and multicolor functionality requires the separately sold QIDI BOX. For a user ready to buy once and work across both decorative and demanding functional parts, however, the Q2 offers exceptional room to grow.
Using the nozzle as the sensor produces a direct measurement of the relationship that matters most for extrusion. This design is presented as independent of the build-surface material and reduces dependence on separate probe placement.
The 65°C chamber limits temperature-related stress, while the 370°C nozzle supports high-temperature polymers and composites. These are meaningful advantages when projects move beyond standard filament.
Triple filtration helps reduce odors and airborne particles during longer jobs. Closed-loop temperature controls, camera monitoring, run-out detection, and power recovery further support a more controlled workflow.
We may earn a commission when you buy through this link, at no additional cost to you.
The FLASHFORGE 5M Pro combines full-auto calibration with an enclosed structure, making it relevant to beginners who want a controlled printing environment. Its 4.0 rating places it behind several higher-rated choices, but the supplied specifications reveal a balanced package for home, classroom, or creative workspaces. One click activates the automatic leveling system, which calculates offsets through distance measurements rather than manual Z-axis calibration.
We may earn a commission when you buy through this link, at no additional cost to you.
The enclosed CoreXY design can print at speeds up to 600 mm/s, while a standard mode is listed at 50 dB and an additional low-speed silent mode is available for uninterrupted work or study. The camera adds remote awareness of the build, while the 280°C direct drive extruder supports materials including TPU, ASA, PLA, ABS, PETG, PLA-CF, and PETG-CF.
Air quality is a central part of the proposition. A HEPA13 filter and activated carbon filter are said to block 99% of particulate matter and VOCs, making the enclosed format more suitable for shared indoor spaces. The auxiliary chamber cooling system helps manage heat inside the enclosure, while multiple quick-detachable nozzle diameters offer a choice between detail and throughput.
This printer is a good match for a beginner who values low noise, enclosure, filtration, and automated calibration more than having the highest rating in the group. It also supports batch file transfer and network monitoring through Orca-Flashforge, along with remote management through the Flash Maker APP. Those capabilities are worthwhile for users planning regular production or classroom-style workflows.
Distance measurements generate the required offsets automatically. This simplifies first-layer setup and reduces the chance that a new user will overlook a height or offset adjustment.
The enclosure contains fumes and particulates better than an open frame, while the dual filtration system treats the air inside. Quiet standard mode and a separate silent mode help fit the printer into shared workspaces.
A heated direct drive extruder and interchangeable nozzle diameters cover common beginner materials and stronger composites. Remote monitoring and batch transmission support users who may manage more than one print.
We may earn a commission when you buy through this link, at no additional cost to you.
The Creality Ender 3 V3 SE presents a familiar Ender-style approach with modern automation. It has a 3.8 rating and focuses on practical upgrades: a CR Touch sensor for bed leveling, a strain sensor for automatic Z-offset, a metal dual-gear Sprite direct extruder, and a dual Z-axis layout. The supplied information says that only three assembly steps are needed and the printer can be ready for a first print in about 20 minutes.
We may earn a commission when you buy through this link, at no additional cost to you.
Maximum print speed is 250 mm/s with acceleration of 2,500 mm/s². The Sprite direct extruder uses a full-metal dual-gear design for stronger filament pushing force and smoother feeding, while the two synchronized Z lead screws reduce Z wobble. Dual 8 mm linear shafts on the Y-axis provide additional support for consistent movement during longer jobs.
The automatic tools cover both bed height and nozzle offset. CR Touch handles the leveling process, while the strain sensor automatically determines Z-offset, removing two separate beginner adjustments. Automatic filament loading and unloading are also supported through the Extrude and Retract controls, simplifying material changes and reducing the chance of feeding filament incorrectly by hand.
The Ender 3 V3 SE is most compelling for someone who values a well-known platform, quick setup, and straightforward automatic calibration without moving to the highest-speed enclosed models. It handles PLA, TPU, and PETG according to the supplied information. Users focused on high-temperature engineering polymers or a fully enclosed chamber should consider a more specialized printer, but for everyday projects this model offers a capable and approachable foundation.
CR Touch handles the bed surface while the strain sensor establishes nozzle height. Combining them reduces the need for separate manual leveling and Z-offset procedures.
Dual Z-axis lead screws and steel Y-axis shafts help limit wobble and vibration. These features contribute to steadier movement and more reliable layer alignment.
Preassembly reduces the initial workload, and automatic filament loading removes another hands-on step. These details help a beginner move from unpacking to a prepared machine with less uncertainty.
We may earn a commission when you buy through this link, at no additional cost to you.
The Creality CR Touch Auto Leveling Kit is the highest-rated selection in the group at 4.4, but it is a sensor kit rather than a complete printer. It is intended to bring automatic leveling and tilt compensation to selected Creality models with compatible 32-bit V4.2.2 or V4.2.7 mainboards. The supported list includes the Ender 3, Ender 3 Pro, Ender 3 V2, Ender 5, Ender 5 Pro, and CR 10.
We may earn a commission when you buy through this link, at no additional cost to you.
The sensor performs multi-point detection across the build platform and records the height at each point. It then creates a virtual plane, calculates the tilt angle, and compensates for differences across the bed. This approach directly addresses the uneven surface and corner-height issues that often trouble new users of manually adjusted printers.
Installation is more involved than selecting a leveling mode on a new printer. The kit includes a CR Touch sensor, five 0.4 mm nozzles, three mounting brackets, ties, screws, and an installation guide. Firmware must be downloaded from the official Creality website, copied to an SD card, renamed to 123.bin, and flashed through the printer's update process.
The kit is a strong option for an owner of a compatible Creality printer who wants automatic bed leveling without replacing the entire machine. It supports PEI, sticker, glass, and metal build plates. Buyers must verify both the printer model and motherboard version before purchasing, and they should be comfortable with installation and firmware work. It is therefore less approachable than a complete printer but more economical than replacing one.
The sensor records multiple heights and uses them to model the bed plane. That allows the machine to compensate for tilt rather than merely bringing the nozzle to a similar distance from several isolated points.
Support for PEI, sticker, glass, and metal plates makes the kit useful across different Creality setups. The nozzle and mounting hardware are included, though the printer itself must be compatible.
The mainboard version is critical because installation depends on matching firmware. Confirming the exact model and board revision prevents the most likely compatibility problem.
We may earn a commission when you buy through this link, at no additional cost to you.
The FLASHFORGE AD5X is built around four-color printing through the Intelligent Filament System, making it attractive to beginners who want visually expressive models rather than single-color parts. Its 4.0 rating reflects a capable feature set, and fully automatic leveling helps preserve the approachable setup experience despite the machine's creative focus. It also supports a maximum printing speed of 600 mm/s.
We may earn a commission when you buy through this link, at no additional cost to you.
The IFS automatically detects and refills filament, reducing interruptions and simplifying material management. This is particularly relevant for multicolor jobs, where different colors must be available and correctly routed. The all-metal CoreXY structure minimizes vibration and supports accurate execution of complex designs, while the 220 × 220 × 220 mm build area provides room for multi-part projects.
A maximum nozzle temperature of 300°C gives the AD5X more material flexibility than basic PLA-only starters. The supplied information also identifies flexible TPU printing as a supported capability, which is useful for functional grip surfaces, protective parts, and other flexible models. The leveling system is automatic, so users do not need to perform manual bed adjustments before printing.
The AD5X is best for a beginner whose creative goals include color, decorative models, and complex visual projects. Its additional material handling is unnecessary for someone who prints one color at a time, and the IFS requires a deeper initial learning process. Even so, the combination of automatic leveling, rapid motion, high-temperature capability, and integrated four-color operation makes it a distinctive option for creative makers.
The Intelligent Filament System manages multiple colors and automatically detects and refills material. This makes multicolor printing a more continuous workflow instead of a sequence of manual changes.
The all-metal CoreXY structure is designed to control vibration during fast and complex jobs. That stability supports clean lines and more accurate execution when color changes divide a model into multiple paths.
A 300°C nozzle and TPU support extend the machine beyond decorative PLA. These capabilities let a new owner explore stronger prototypes and flexible components as skills develop.
We may earn a commission when you buy through this link, at no additional cost to you.
This Creality Ender 3 V3 SE listing emphasizes beginner-friendly setup with CR Touch automatic leveling and automatic Z-offset calibration. Its 4.1 rating places it slightly behind the AD5M Pro and AD5X, but the machine's automation addresses two of the adjustments beginners commonly struggle with. It can print at up to 250 mm/s with acceleration of 2,500 mm/s², shortening print times while supporting detailed results with compatible materials and recommended settings.
We may earn a commission when you buy through this link, at no additional cost to you.
The Sprite direct drive extruder provides smooth, consistent feeding for PLA, PETG, and TPU. Its direct drive layout keeps the filament path short, which is useful when moving between soft and rigid materials. The motor and filament handling are therefore important parts of the machine's appeal for everyday functional parts as well as decorative models.
Dual synchronized Z-axis lead screws and precision Y-axis linear shafts work together to reduce vibration and Z wobble. The 32-bit silent mainboard helps create a quieter operating environment, while the flexible PC spring steel plate allows models to be removed with less force. This combination makes routine maintenance and part retrieval more convenient for someone new to handling finished prints.
This selection is a straightforward option for a beginner who prioritizes automatic calibration, familiar direct drive operation, and a quiet machine. It is less suitable for advanced thermoplastics because of its open-frame format, and buyers should note that this listing describes the same Ender 3 V3 SE model featured elsewhere in the guide. Its core appeal remains a simple path from assembly to repeatable first layers.
CR Touch establishes the bed level while automatic Z-offset calibration sets the nozzle relationship. Combining these functions makes the first print less dependent on manual measurement.
Dual Z-axis lead screws support consistent movement along the vertical axis, and the Y-axis shafts help control wobble. These mechanical details support more stable results during longer prints.
The silent mainboard reduces operating noise, while the spring steel plate simplifies removing completed pieces. Small workflow conveniences can make the early stages of ownership considerably less frustrating.
We may earn a commission when you buy through this link, at no additional cost to you.
The right choice depends on whether you want a complete printer, an upgrade for an existing machine, or an inexpensive aid for manual bed adjustment. The following factors help separate genuine automation from basic convenience and identify the features that matter most during early projects.
Native automatic leveling is the simplest option for a first printer because the machine measures the bed and calculates the nozzle-to-bed offset through a built-in routine. A one-click or one-tap process is particularly useful when a beginner does not yet understand how leveling, Z-offset, and first-layer adhesion interact. The Adventurer 5M, AD5M, K2 SE, AD5X, and 5M Pro all advertise automatic calibration, while the Ender 3 V3 SE uses CR Touch and a strain sensor.
Prioritize a clearly described calibration process and a build surface that is included or straightforward to install. Automatic leveling does not eliminate every adhesion issue, but it removes a major source of avoidable frustration.
Automatic systems use different sensing methods. The QIDI Q2 uses the nozzle as its leveling sensor, while the Creality CR Touch kit uses a separate sensor that measures multiple points and compensates for tilt. A dedicated sensor can be useful when upgrading an existing printer, but it may require installation, firmware changes, and exact model compatibility. Nozzle-based sensing is integrated directly into a complete machine and may offer a simpler out-of-box experience.
Check whether the sensor supports the printer's build surface and whether the manufacturer documents the calibration sequence. Clear compatibility and update instructions are more valuable than vague claims about precision.
A level bed is only one part of first-layer success. Surface texture, nozzle condition, extrusion consistency, temperature, and filament condition also affect adhesion. The removable PEI plates on several FLASHFORGE models provide a practical surface, while the Q2's 65°C heated chamber helps reduce warping. Open-frame printers are often simpler and may handle common PLA, PETG, and TPU projects well, but they offer less control for temperature-sensitive materials.
For most beginners, prioritize a dependable stock surface and straightforward temperature controls. Choose an enclosed heated-chamber model only when advanced thermoplastics or consistent environmental control are central to your planned work.
Maximum speed is only one part of performance. CoreXY layouts, rigid frames, linear motion components, acceleration controls, and vibration compensation all influence whether a printer can produce clean results quickly. The FLASHFORGE models listed reach 600 mm/s, the Creality K2 SE reaches 500 mm/s, and the Ender 3 V3 SE reaches 250 mm/s. These figures are best treated as machine capabilities rather than guaranteed output rates for every filament and geometry.
A beginner should use conservative, material-appropriate profiles and increase speed gradually. A rigid structure with effective vibration control is usually more valuable than chasing the highest headline speed.
The filament system determines how consistently material reaches the nozzle. Direct drive extruders provide a short, controlled feed path, and several featured machines include automatic loading, unloading, run-out detection, or recovery. The Creality K2 SE and Ender 3 V3 SE emphasize direct drive, while the Adventurer 5M includes a run-out sensor and power-loss recovery. These systems help protect long jobs, although they do not replace correct spool handling or basic maintenance.
For a new user, automatic loading and clear run-out handling are helpful. For flexible TPU, confirm that the documented material support includes the exact filament and nozzle arrangement you intend to use.
Most complete printers in the guide offer a cube measuring 220 mm on each side. The Creality K2 SE has a listed volume of 220 × 215 × 245 mm, and the Ender 3 V3 SE is described with an 8.66 × 8.66 × 9.84-inch build area. Build volume should match the objects you actually want to make. A larger volume is useful for enclosures and multi-part assemblies, but it can also increase the space, time, and material demands of a project.
Beginners should consider whether they will print small detailed objects, household parts, cosplay pieces, or large assemblies. Choose a size that accommodates your goals without encouraging projects that exceed the printer's practical capabilities.
Some purchases can grow into a broader system. The Creality K2 SE supports the separately sold CFS for multicolor printing, the AD5X includes a four-color Intelligent Filament System, and the QIDI Q2 works with QIDI BOX for up to 16 colors and dry-while-print operation. These are compelling for visual projects, but they add cost, setup complexity, and a larger learning curve compared with a single-filament machine.
Choose an expandable model when multicolor work is a realistic near-term goal. Otherwise, focus on the basic single-color workflow and spend your attention on mastering slicing, materials, and first-layer settings.
The right spending decision depends on what you already own. A complete printer provides an integrated leveling system and a larger set of capabilities, while the E-Leveler 2 offers a focused way to improve a compatible manually adjusted bed. The CR Touch Kit is intended to add automation to selected Creality printers, but its compatibility list and firmware procedure are narrow. Buying an upgrade solely because it seems cheaper can be disappointing if the printer model is not supported.
Match the product to your current equipment. For a first printer, prioritize a complete, supported system; for an existing machine, verify all model and board details before purchasing an add-on.
Begin with a clean build plate and confirm that the printer is standing on a stable, level surface. Remove any visible debris or residue from the previous print, but use a cleaning method appropriate for the plate material. Load the filament according to the printer's instructions, attach the correct nozzle, and confirm that the nozzle is not visibly damaged. Before starting a project, run the complete automatic calibration routine rather than skipping it because the bed was previously adjusted.
Slice the model with the material-specific settings supplied or recommended by the manufacturer. For a first layer, use the default or recommended layer height and ensure the nozzle is sufficiently close to the plate to create a continuous line without gouging the surface. Watch the opening layers closely: consistent width, adhesion to the plate, and no visible gaps are stronger signs of a sound first layer than appearance alone. If the line is too narrow or separates, recheck calibration and surface cleanliness.
Monitor early prints, keep the filament path free of tangles, and do not move the printer while it is operating. Clean the nozzle and wipe the plate between materials when necessary. Keep the machine in a well-ventilated location, especially when printing engineering polymers, and use an enclosure or filtration system when appropriate. Update firmware and software when instructed, and never attempt an upgrade or sensor installation without confirming compatibility first.
Automatic bed leveling measures the relationship between the nozzle and build plate, then records or calculates the corrections needed across the print area. This reduces the need to adjust the bed manually and improves first-layer consistency. The process usually cannot compensate for a dirty plate, poor filament, an incorrect Z-offset, or a damaged nozzle.
No. Auto leveling addresses bed height and tilt, but adhesion also depends on surface cleanliness, temperature, extrusion flow, filament condition, and layer settings. A well-leveled nozzle can still produce a poor first layer if the plate is oily or the material settings are wrong. Always verify the first few layers and clean the surface between prints.
Choose a complete printer if you do not own one, since it provides an integrated leveling system and a coordinated software and hardware setup. An upgrade kit makes more sense when your existing printer is compatible and you want to improve it without replacing it. The E-Leveler 2 is also useful for a manual-bed printer that needs clearer visual guidance.
No. The listed kit is compatible only with specified models that use the appropriate 32-bit V4.2.2 or V4.2.7 mainboard. Confirm the printer model and motherboard revision before purchasing, and follow the supplied firmware-flashing process. Installing it on an unsupported model can prevent the upgrade from working as intended.
No. The E-Leveler 2 is an electronic visual guide used while a user manually adjusts a compatible bed. It does not measure points, calculate offsets, or calibrate the printer automatically. It can still make the process more understandable for a beginner, but a native sensor system offers greater automation.
No. A heated chamber can reduce temperature-related warping and improve layer adhesion, particularly with materials such as ABS, but it cannot fix a dirty plate, incorrect nozzle height, clogged nozzle, or poor slicing settings. The Q2 combines its heated chamber with nozzle-based sensing, yet correct setup and material selection remain essential.
No. Maximum speed is a machine capability, not a universal recommendation. Start with the material profile supplied by the slicer and increase speed only when the printer produces clean walls, corners, and fine features. Acceleration, cooling, nozzle size, and layer height all influence the practical speed a project can sustain.
Run the calibration whenever the printer is moved, the plate is removed or replaced, the nozzle changes, or the first layer shows a consistent problem. Checking it before every print is a sensible habit for a beginner, even if the printer does not technically require it each time. A stable surface should also be cleaned and inspected between jobs.
The FLASHFORGE Adventurer 5M is the strongest all-around recommendation because it combines one-click fully automatic leveling with fast CoreXY printing, a removable PEI plate, and useful recovery features. The QIDI Q2 stands out as the premium option with nozzle-based sensing, a heated chamber, advanced material support, and filtration, while the E-Leveler 2 provides the most focused budget solution for improving a compatible manually adjusted bed.
Prioritize the workflow that matches your experience and existing equipment. A new owner should look for clear one-click calibration, a reliable stock build surface, and direct drive or automatic filament handling. An experienced hobbyist with a compatible Creality printer may get more value from the CR Touch upgrade, while creative users may prefer the AD5X's four-color system or the K2 SE's CFS expansion path.
Before purchasing, verify the printer's exact specifications, material support, build volume, and upgrade requirements. Product listings and selling prices can change, so check the current product page and warranty information at the time of purchase. Whichever option you choose, complete the calibration, use material-specific settings, and monitor the first layers closely to build a reliable printing habit.